dinsdag 18 juni 2013

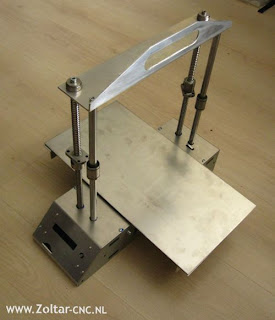
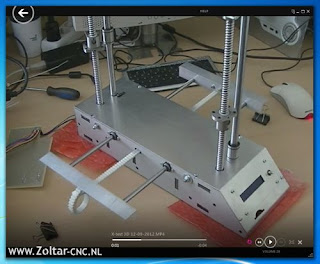
Zoltrbot back home....

Its been a while,.......

Changed the J-head to kind of hybrid with detachable nozzle.


Did have a new trial over the weekend...

Previous test with the PLA did fail as the PLA got
desintergrated in the feedertube.
It was hard to get the remains out of the PTFE tube and hotend.
The domed nut makes it a lot easier I must say.

Anyhow,

Its moving....and plastic-ABS is getting out.
But no decent product printed yet.
I even ruined some of the settings Rik previously made.


For the calibration I could use real help getting the settings right

into the Arduino. Is there anyone in NL, Kampen region
willing to give me a hand on on this?
That would be much appreciated!

just contact me at:


____________________________________________________________


Next to that .... what I think a very interresting development:


http://www.indiegogo.com/projects/easy-reprap-electronics


http://www.youtube.com/watch?v=Cmlr97qLxYA

This is one of the first really decent& complete reprap electronics Ive seen so-far.
On the software side not much has changed but this is a superb improvement to the hardware.
compared to the previous cable salad situation we have with the Ramps.
>Support up to 3 extruders!
>Decent display
>Dialer & Cardreader to have it work stand alone
>All stepperdrivers

Lets make 3D printing more accessible
to the electronically less fortunate hobbyists............

Help Dirk to make this very nice piece of electronics available!

Act noW!  - 48 hours left


zondag 10 februari 2013

New feeder-design has ultimate grip with mini Hyena!

Got the New filament feeder with the Mini Hyena working now.
It does have a superb grip on the filament.
In the bottom I made an extra hole for eventual rasps getting off the filament.
So then there is no risk of clogging up in there.

The Hyena gear- lineup- with the filament & hollow bearing
is perfectly to adjust with the M3 Hex screw.
The extra supportbearing on the shafts-end, was a good choice.


Cant even tear an inserted filament out of the assembly anymore....


Rik are you ready to start callibrating and testing soon?
Hope these small steppers with reduction are up to the job.

-chris-

zaterdag 19 januari 2013

Hyena adapted filament feeder

Next -for the filament feeder -
I will test a reduction motor removing the big gear and Nema17
The reduction motor is similar priced as the Nema17 so worth a try.
This setup is now modified to take up the 8mm shaft Hyena
and uses the hollowed 608 bearing.


It does look rather complicated but its just a stack of fairly simple
cutup from 8mm trespa parts.
The backplate can be modified to several type of steppermotor mounts.
This way it can be adapted more easily to other available motors (in time).
Its a more convenient easy to adapt testbed.

Looking forward cutting the needed parts comming weekend.

More later.

dinsdag 15 januari 2013

Zoltrnot ready....!

The original hobbed bar / gear has been replaced for the "Hyena" hobbed bar from Arcol.hu
(
http://shop.arcol.hu/) that I did order some time ago.

http://www.zoltar-cnc.nl/media/forum/Hyena8mm09012012.MP4

Also did purchase the hollowed bearing what does not deform the filament.
This extra bearing is prob not needed as the hollow shape of the hobbed bar
takes care of the alignment well.

This 8mm Hyena has real good grip on the filament.
Even with the little spring - what worked insufficient with the first gear-
it does now show some great improvement.


Preparing the previous week for our meeting last weekend,
I figured nothing could fail now anymore....
Man I was wrong.

Murphy's LAW struck by lightning, although no blast ;D
A lot of stinky smoke indicated an electronics part did fail.
The heater that worked last time without any problem - died -
Pity, as there is no printed plastic product to show here now.


That was the end of this exercise, although electronics,
switches and display dialer & cardreader work well now.
Mechanics with a new ballbushing installed runs very smooth.

Next waiting for a new hotend resistor and Rik

will takeover further testing as the setup is now at his place.

-chris-

(http://www.zoltar-cnc.nl/forum/index.php?topic=25.300)

maandag 31 december 2012

Zoltar 2013-PR- New years resolution for 2013!

Looking back on 2012 and moving into 2013, .....

It took me little over a year, but now I figured out a "heavy duty" Version
developed from the current joined 3D printer project overhere:


Proud to announce is now a new Zoltar 3D printer concept ....
(and of course)
Now a combined (hybrid) 3D router CNC-pcb cutter/mill-router with a 3D printer.

Since it may take a longer time before the community
can actually 3D-print accurately usable PCB's@home
a combined tool like this new setup may provide
a true usable solution for the time being.

See also:
http://kprize.wordpress.com/prize-specifications/
•Print at least three different materials,
including one that is usefully electrically conductive.
•The ability to print electronic circuit boards.


Due to its build-in reduction its still fast enough for 3D printing (9~10m per Minute)
and is rigid & precise enough to use it for CNC cutting applications.

This next Zoltar-2013-PR-setup can solve the problems combining
a CNC router and 3D printer into a Hybrid .

Specs:
All stainless steel enclosure and Chassis.
Hardened steel rails and ball bushings.
All belts shielded for safety.
Z-axiz is ballscrewdriven for higher repetition accuracy.
Y and X resolution gets at 0.05mm mm repetition or even better accuracy.
(as can be concluded from mechanical trials with the first setup)
Tabletop can be detached easely for compact transport.

Applications:
As a 3D mill: using a lightweight brushless rotary motor with ER11-mount,
and with 100mm toollength a cutting volume 200x200x100mm -XYZ-.
-Purpose foam and light materials
As a router/ PCB cutter - a lightweight brushless rotary motor
on a floating Z-axiz for cutting PCB's with dust drain by vacuum
-3D printer with dual heads- so two colors 3D printing.

It uses now a toolplate on Y - for a quick toolchange, and conversion.

So-far my 2013 - New Years Resolution!

Ideas, support is more than welcome!
Contact me :


Wishing all visitors a Happy 2013 and the best print (and CNC-cutting) possible.

Greetings!
Chris Reinders,
Designstudio Zoltar, Kampen The Netherlands.

donderdag 6 december 2012

Christmas maze & J-head mod

Trying to get into the Chrismas spirit.....preparing for the first actual print.... 

- A (symbolic) tree -

Download STL HERE


Pronterface accepts the STL now.
Some small issues left to solve and fix:

1-st install the "Hyena" for optimal bite

(For reference bottom pic the current filament "gear" which does not work that well)

Original on the J-head only a tiny hole was provided to mount the sensor....
Could not imagine and find the thoughts behind that.

A dependable fix for the sensor has been achieved with the above solution.
Clamped and glued with heat suitable silicone keeps the sensor in position.

The final dependability finds itself often in the detail..... ;)

-chris-


zondag 18 november 2012

Zoltrbot - moving!


In the end a stepstick change and and some rewiring made it work....
The Marlin & Arduino software has a steep learning curve for me.
There are many settings possible.
This means a lot more exploring on this matter for me.
A whole new Adventure!

At least the mechanics does behave very nice to rapid changes,
no backlash so that seems sorted so-far.

Now next to do is the need tidying it up,
connect the display and cardreader
and make it ready for the further calibration & first trialprints.

Hoping now for printed Christmas tree decorations.....

-chris-

donderdag 8 november 2012

Final touch- Zoltrbot- 3D printer....

No prints yet,...
Using the printer later-on itself, the covers on the Y-Axis sides
and cover of the reduction on the backside can be printed.

Just to dress it up a little and make it a cleaner design.
Also these items shields the moving parts and makes the machine safer.
So form follows function!

Doesn't look like a prototype anymore now.... ;-)

donderdag 1 november 2012

Zoltar 2012-NC is Alive and Cutting !


A unique all Stainless steel structure,  

ballscrew driven CNC machine toolkit

> under 1000 € to be build <
 
Check it out now:
 
Short movie cutting ALU for trial:


maandag 8 oktober 2012

Assemby Y axis - Zoltrbot


Another small step ahead......


Temporarely mounted the Y-8mm shaft(not hardened),
Just checking if the holes do allign and Y-cariage fits.
Exploring also the right position for the filament feeder......
Mount on the end of Y -axis (in CAD figured out) gives a tight
loop in the PTFE tubing when the printerhead is moved near the feeder.
The tight bend is prob not very helpfull for
a constant propulsion of the filament.


Next install the drive mechanics and finish this prototype setup.
 
More info's & other CNC-projects:

 
-chris-


donderdag 20 september 2012

Progress on Zoltrbot.....

 
 Some structural progress has been made
               over the last weeks ...


     and the basis X -axis is now working...
 
 
Not as fast as I was aiming at or hoping for,
but about 9-10 M/minute is no problem and very useable.
The accuracy with its reduction is more then sufficient.
Measuring with a digital caliper its repetition accuracy 
I get about 0,05mm or better.
Using a measuring clock should provide more
details on that lateron.
 
  Looking good sofar!
 
  Here a short video:
 
  
          Zoltrbot - testrun X Videolink ~3Mb
   The testcycle does contain 200mm lines - 10 M/minute
 
The Bridge -Y axis parts will be cut and buildup next.
As it has the same mechanism as X,
it will have a similar running behaviour.
 
Now figuring out the position & mount for the filament propulsion.
Best position would be on one end of the bridge


Sofar the journey into this 3d-printing adventure!


vrijdag 3 augustus 2012

Cutting Parts & start prototype build - Zoltrbot


Here the first steps into the real world.
Cutting went actually pretty well.


Preassembly was easy within 10 Minutes.
Finding the right nuts and bolts took most of the time.

Next assembly of the drive mechanism.

Comments welcome!

-chris-

(www.zoltar-cnc.nl)

donderdag 26 juli 2012

Basic 3D-design done, now detailing........


Finally the basics are done.
This is what the setup is gonna look like.

Most major parts in position now,
only the detailing left to do....
That is to finish the design.

Finishing should not take too long,
as I did cover most of the design issues by now.

Next the prototype buildup.

-chris-

zondag 22 juli 2012

The next step, Proterface software

Some progress here.....

Did finally get to install and get the software working with the electronics.
Rik did preconfigure the Arduino card with breakoutboard for me
so I can have a quickstart

The Github - printrun instruction was very helpfull with installing
the Proterface software and get it to work.

https://github.com/kliment/Printrun
INSTALLING DEPENDENCIES

Windows

precompiled version is available at http://koti.kapsi.fi/~kliment/printrun/

Download the following, and install in this order:
1.http://python.org/ftp/python/2.7.2/python-2.7.2.msi
2.http://pypi.python.org/packages/any/p/pyserial/pyserial-2.5.win32.exe
3.http://downloads.sourceforge.net/wxpython/wxPython2.8-win32-unicode-2.8.12.0-py27.exe
4.http://launchpad.net/pyreadline/1.7/1.7/+download/pyreadline-1.7.win32.exe
5.http://pyglet.googlecode.com/files/pyglet-1.1.4.zip

For the last one, you will need to unpack it, open a command terminal,
go into the the directory you unpacked it in and run python setup.py install


Did find out that its 23 deg C° - Summer did arrive here!


Change of heart...cheaply available LMU ballbushings did change my mind in the X-base design.
All planned features with reduction maindrive does remain the same.

Now the electronics including powersupply, display, dialswitch and most of the cables can be
kept inside the base.

I think, pretty neat!

Next the Y axis design, finishing the bridge.

-chris-

maandag 9 juli 2012

zondag 20 mei 2012

New Hot-end mount and Y-Axiz design completed

The basic design on the extuder, hotend and the Y assembly has been completed.
Most parts can be reproduced by cutting them on a CNC Router - which is of course the goal!

Next finalizing the moving tabletop (x-axiz) and finishing bridge design (the Z-axiz)


Hope the challenge of saving weight is worth all the effort in the end.
This Assembly could be created even lighter if made from Epoxy/carbon or even Alu sheet.


Thanks for dropping by!

zaterdag 5 mei 2012

Filament Feeder

Too may things on my mind, finally cranked it up a notch... After spending much time on details since febuary, started cutting the parts this afternoon and voila a extruder feeder, now almost ready for testing. More to this topic on the forum. http://www.zoltar-cnc.nl/forum/index.php?topic=25.0 -chris-

zondag 26 februari 2012

3D printing versus CNC cutting....

On

we are in the process creating a 3D printer
completely CNC cut and made out ofTrespa material.


Starting of with the filament extruder,
Hotend, moving table and finaly the Z and Y Axis.